If you are brand new to Klaviyo, setting up your first flow can feel more complicated than it needs to be. The good news is that your first automation does not need to be advanced to be effective. In fact, Klaviyo defines a flow as an automated sequence triggered by customer behavior or profile activity, and the platform itself recommends starting with the highest-impact lifecycle automations first rather than trying to build everything at once.
For most beginners, that first flow should be a welcome series. Klaviyo specifically lists the welcome series as the first flow to prioritize, followed by abandoned cart, post-purchase, and winback. That advice still holds in 2026 because a welcome flow is the simplest way to greet new subscribers, introduce your brand, and turn signups into first-time buyers.
At Klaviyo Consulting, we help brands build and optimize Klaviyo automations with a strong focus on segmentation, personalization, lifecycle flows, deliverability, and Shopify-connected data strategy. That matters because the difference between a flow that merely sends and a flow that drives revenue usually comes down to setup quality, trigger logic, timing, and content relevance.
What is a Klaviyo flow?
A Klaviyo flow is an automated sequence of actions that starts when someone takes a specific action, joins a list or segment, reaches a date-based milestone, or meets another trigger condition. Flows can include delays, emails, SMS, splits, and profile updates, which makes them ideal for lifecycle marketing instead of one-off campaign blasts.

That is the main reason flows are so powerful for ecommerce brands. Instead of manually emailing every new subscriber or customer, you create the logic once and let Klaviyo handle the delivery based on real-time behavior. When your store and data sources are connected properly, the automation becomes both scalable and personal.
Why beginners should start with a welcome flow
Your welcome flow is usually the easiest automation to launch because it is tied to one clear event: a person joining your email list. Klaviyo even provides a pre-built welcome series in many accounts, and its help documentation explains that this flow is meant to trigger when a new subscriber is added to a list.
A beginner-friendly welcome flow also teaches you the core building blocks you will use later in more advanced automations. You learn how triggers work, how delays affect timing, how message status works, and how to review your flow before it starts sending. Once you understand those basics, moving into an abandoned cart and post-purchase becomes much easier.
Before you build anything, make sure your account is ready
Klaviyo recommends completing your account setup before building flows. That means your basic account configuration should be in place, your lists and segments should make sense, and your ecommerce integration should already be connected so the right events and customer data are available.
If you are using Shopify, this part is especially important. Klaviyo Consulting’s service positioning emphasizes Shopify and Klaviyo integration strategy because strong automations depend on accurate real-time sync for customer, order, and product data. A flow can only be as good as the data feeding it.
Step 1: Choose your first flow type
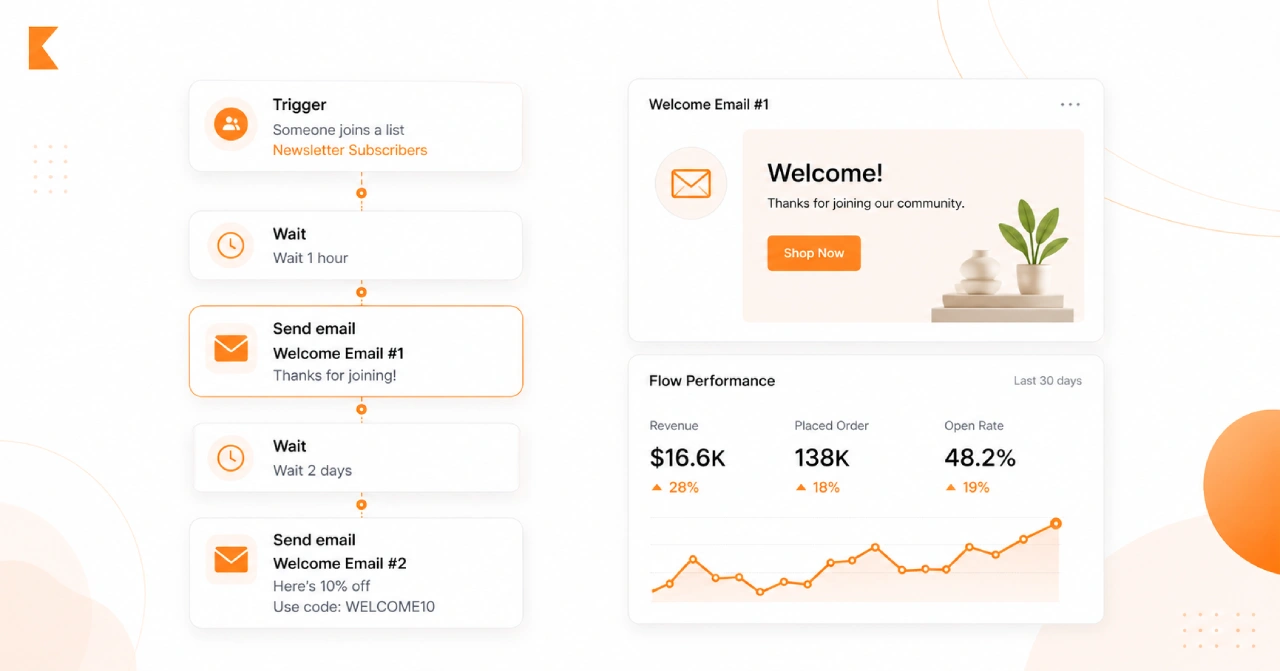
For a true beginner, the best starting point is usually a list-triggered welcome flow. A list-triggered flow starts when someone joins a list, and Klaviyo’s documentation notes that welcome series are commonly connected to the main email signup list.
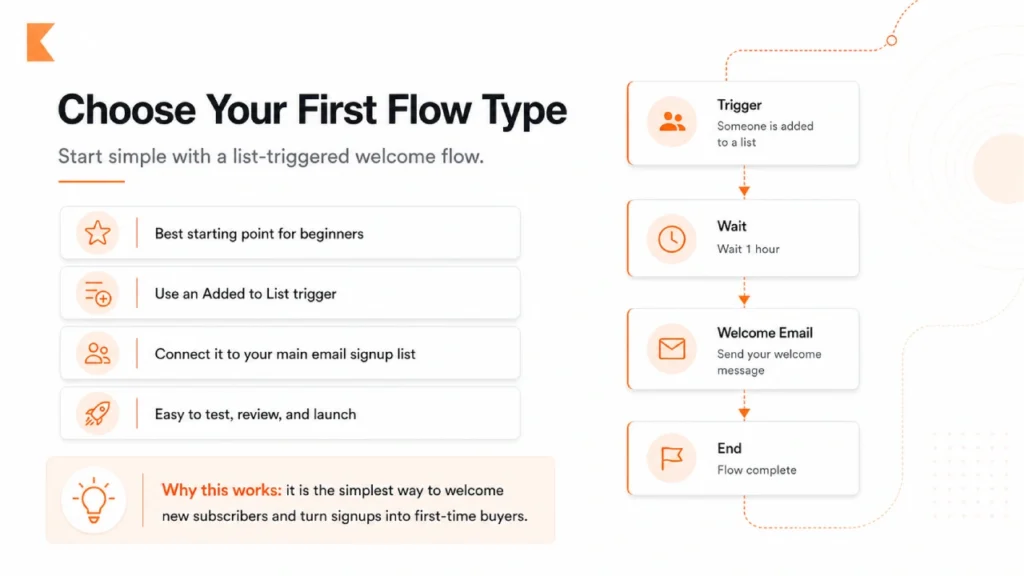
This keeps the setup simple. Instead of dealing with complex product events or checkout behavior, you are working with one easy trigger: “Added to list.” That makes it much easier to test, troubleshoot, and launch with confidence.
Step 2: Create or confirm the right list
Before building the flow, confirm which list new subscribers are being added to. Klaviyo explains that your welcome series must be connected to a specific list, and whichever list you choose should be the one your signup forms actually feed into.
This is where a lot of beginners make their first mistake. They build a welcome flow but connect it to the wrong list, or they have multiple similarly named lists and forget which one is active. Klaviyo’s review guidance specifically warns users to verify that the selected list or segment is the correct trigger.
Step 3: Go to Flows and create the flow
In Klaviyo, navigate to the Flows tab and click Create flow. From there, you can either choose a pre-built flow from the library or build your own. Klaviyo’s getting started guide recommends the Flow Library for beginners, while newer accounts may also have access to Flows AI, which helps generate a flow structure from natural language prompts on paid plans.
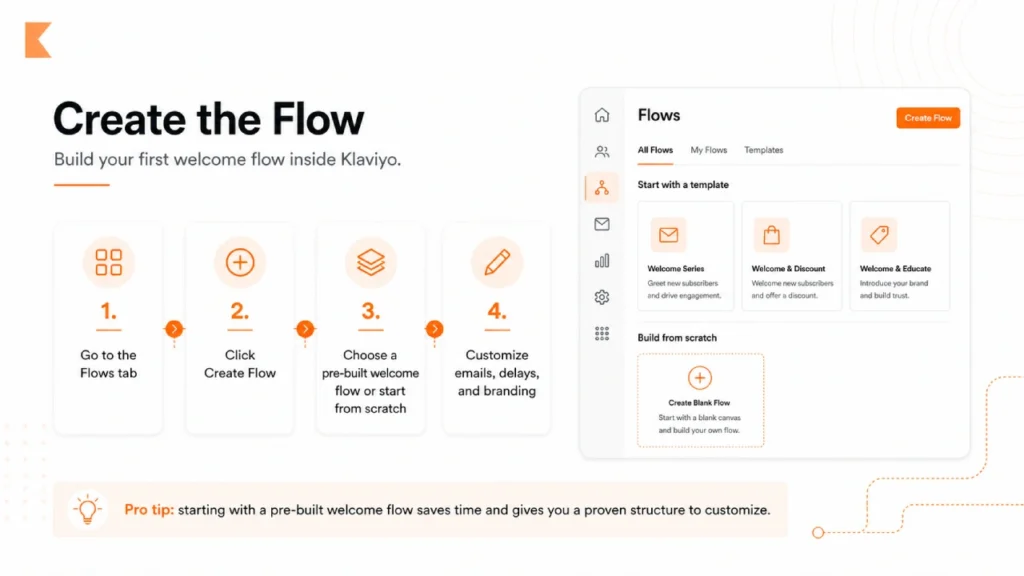
For most first-time users, the easiest route is to start with a pre-built welcome flow and customize it. That gives you a proven structure without forcing you to design every step from scratch on day one.
Step 4: Select the trigger
If you are building a beginner welcome flow, choose Added to list as the trigger and select your main email signup list. Klaviyo’s list- and segment-triggered flow documentation confirms that these flows begin when someone newly joins the chosen list or segment.
In 2026, Klaviyo also gives more control over re-entry criteria for list- and segment-triggered flows. For a welcome series, the right setting is generally no re-entry, because a welcome flow is typically meant to be received once. Klaviyo’s updated documentation specifically lists welcome series as a common use case for no re-entry.
Step 5: Add your first email and timing delay
Once the trigger is set, add your first email. A strong beginner structure is simple: send the first message immediately or shortly after signup, then add a time delay before the next message. Klaviyo describes flows as sequences that can include time delays between actions, which allows you to control the customer experience rather than sending everything at once.
For most brands, the first welcome email should do three things clearly. It should confirm the signup, introduce the brand, and give the subscriber a reason to stay engaged. That might be a brand story, a best-seller highlight, a first-order incentive, or a simple explanation of what kind of emails they will receive.
Step 6: Write beginner-friendly welcome emails
Klaviyo’s example welcome series commonly includes multiple emails, and the platform encourages users to edit those templates to match their branding. For beginners, a three-email setup is usually enough to get started without overcomplicating the build.
A simple structure works well:
Email 1: Welcome the subscriber, set expectations, and deliver any promised offer.
Email 2: Introduce your brand story, value proposition, or hero products.
Email 3: Build trust with social proof, FAQs, product education, or a final reminder to shop.
This approach is effective because it moves from introduction to persuasion in a natural sequence instead of trying to close the sale in a single message.
Step 7: Add filters only when they actually help
Klaviyo allows you to refine flows with trigger filters and profile filters. Trigger filters narrow who enters the flow based on the triggering action, while profile filters help determine who should continue through the flow.
For your first flow, keep filtering simple. Beginners often add too many conditions too early, which makes troubleshooting harder. A practical example would be excluding people who already placed an order, depending on how your signup path works. The goal is not to build the smartest-looking flow. The goal is to build a reliable one.
Step 8: Review the content, trigger, and timing before going live
Before turning a flow on, Klaviyo recommends reviewing the trigger, delays, and message content carefully. Its “ready to send” checklist is built around exactly that process, because even a small setup error can affect who enters the flow and when messages send.
This is the point where you should check the basics. Make sure the right list is selected. Make sure your delays reflect the customer experience you want. Make sure every email has a real subject line, preview text, branded content, working links, and the correct sender information. Beginners lose a lot of revenue here by rushing the final review.
Step 9: Understand flow statuses before launch
One of the most confusing parts of Klaviyo for first-time users is that flows do not have one universal on/off switch. Klaviyo states that each message has its own status: draft, manual, or live. That means a flow can exist in your account while individual messages are still unfinished.
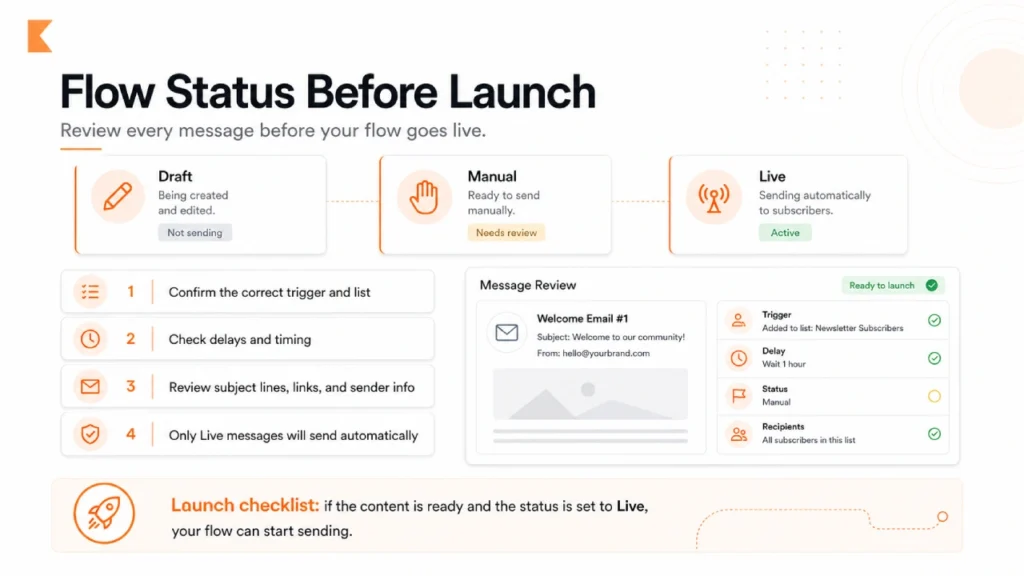
This matters because a flow is not truly sending unless the relevant messages are set to live. Klaviyo also explains that you can turn messages live one by one or use the Review and turn on process to update configured actions in bulk.
Step 10: Turn the flow live and monitor performance
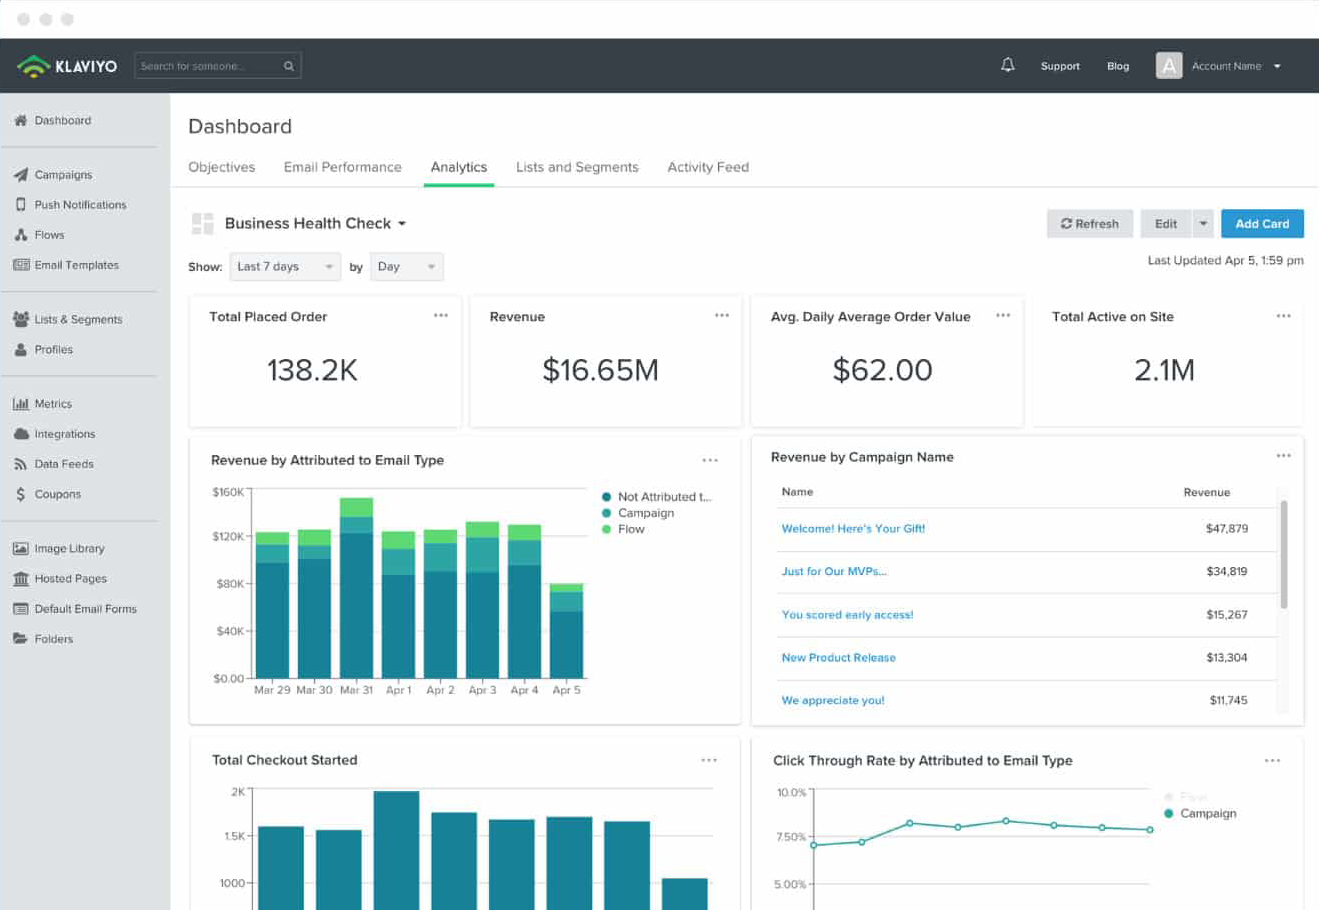
Once everything is reviewed, change your configured messages to live and let the flow begin sending to qualified recipients. After launch, the monitor opens, clicks, places orders, and conversion quality so you can improve the flow based on real behavior instead of guesswork. Klaviyo’s flow resources also point users toward analytics and testing as part of ongoing optimization.
Your first live flow does not need to be perfect. It just needs to be correct, clear, and active. Optimization comes after launch.
Common beginner mistakes to avoid
The most common mistake is choosing the wrong trigger. Klaviyo’s documentation repeatedly emphasizes trigger selection because everything in the flow depends on it, including filters, timing, and who gets the messages.
Another frequent mistake is importing subscribers into a list while a welcome flow is active. Klaviyo notes that importing profiles into a list can trigger a list-triggered flow, which means existing subscribers may accidentally receive a new-subscriber welcome sequence unless the flow is turned off first.
A third issue is trying to use one welcome flow for both email and SMS. Klaviyo advises keeping email and SMS welcome series separate because subscribers may opt in to each channel at different times, and each welcome series can only be entered once.
What matters most in 2026
The fundamentals have not changed: the best flows still depend on clean data, clear triggers, relevant segmentation, and strong message sequencing. What has changed is that Klaviyo now offers more modern flow-building options, including Flows AI for paid accounts and updated re-entry controls for list- and segment-triggered flows. Those features can make setup easier, but they do not replace strategic thinking.
That is exactly where expert support helps. Klaviyo Consulting positions itself around flow optimization, segmentation strategy, personalization, deliverability, post-purchase lifecycle work, and Shopify-connected automation planning. For brands that want to move faster and avoid costly setup mistakes, having a specialist build or audit your first few flows can shorten the learning curve dramatically.
Final thoughts
Setting up your first Klaviyo flow in 2026 does not have to be overwhelming. Start with a welcome flow. Keep the trigger simple. Review every message carefully. Then launch, learn, and improve. That is how strong lifecycle marketing systems are built.
And once your first flow is live, the next opportunities usually become obvious: abandoned cart, post-purchase, winback, segmentation improvements, and smarter personalization. Klaviyo already identifies those as the next high-impact flows to prioritize, and they become much easier once your foundational setup is done correctly.For brands that want a cleaner setup, stronger automation logic, and better performance from the start, Klaviyo Consulting can help design, build, and optimize flows that do more than just send emails.